Combining Thick, Thin, and Textured Yarns
Posted by Jodi Ybarra on
"Fiber Fiesta Napkins"

With this project we are going to experiment with thick, thin and textured yarns. By combining different thicknesses of yarn and textures you can create unique, textured fabrics without complicated stitch patterns.
There are a few things to consider when mixing yarns. Choosing colors that coordinate and fiber content are some factors that you should consider.
I like to start by deciding on what I'll be making and what the items will be used for. This helps with choosing the types of yarns to use.
Will you be weaving towels, placemats, totes or maybe even a cute top or skirt? Knowing what you will be making will determine the yarns you will choose.
For this project my yarn of choice is COTTON and this pattern will make four matching napkins.
Make your weaving time even more enjoyable with our specially curated Weaving Kits! Our Fiber Fiesta Napkin kit makes gathering your supplies easy. This kit includes an assortment of 8 different yarns and the weaving pattern to create these beautiful towels for your home, or to gift to loved ones.
The Benefits of Cotton
- Softness and Comfort... One of the primary advantages of using cotton is its softness and comfort.
- Durability... Another key advantage of using cotton is its durability.
- Breathable... Cotton is also highly breathable, which makes it an excellent choice for warm weather clothing and accessories.
- Absorbency... Perfect for weaving towels and napkins.
- Easy to Care... Machine wash and dryable becoming even more stable after wet finishing.
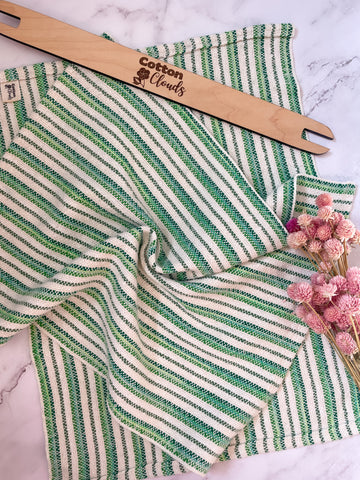
Fiber Fiesta Napkins ~ Olive You
Here are a few tips to keep in mind when mixing yarns.
- Choose yarns with similar fiber contents. For example, wool yarns may not mix well with cottons. Also consider if your yarns are mercerized or unmercerized. Mercerized cotton doesn't shrink as much as unmercerized cottons and aren't as absorbent.
- Do my yarns need special care such as hand washing or dry cleaning? If you are weaving napkins or towels, it's best to choose yarns that won't need special care since they will be laundered often.
- When adding thick textured yarns with thinner fibers you may need to double the thinner yarns, so they don't get lost or change the sett too much.
- Choose colors that mix well. I like to use lights, mediums and darks in the same color family. You can get as creative as you want while mixing colors, but still choose colors that complement each other. It's also fun to add a variegated yarn in the mix. Adding solid colors that coordinate with the variegated yarn makes choosing colors much easier.

Fiber Fiesta Napkins ~ Calico Cat
With all that in mind, this napkin project will need to have certain qualities of absorbency, durability and softness. Natural fiber yarns such as cottons and bamboo will surely fit the bill for this project!
It's going to be a lot of fun choosing our color pallets and different textured yarns for this one!
Let's Get Started!
- Gather your supplies ~ You will need any number of natural fiber yarns in an assortment of colors and textures. We've supplied a pattern in this blog to help you get started. The pattern will be a base that will give you the weaving width, suggested sett and finishing techniques to weave four napkins. This pattern suggests using eight different yarns, but you can use more or less to suit your design.
- We supply the pattern ~ You can also download this pattern as a PDF in our Cotton Clouds Rigid Heddle Weaving Facebook Group. Just click on Files at the top of the group page and you will be able to retrieve your PDF pattern to print.
-
We make it easy! Our Fiber Fiesta Napkin kit makes gathering your supplies easy. This kit includes an assortment of 8 different yarns including Aurora Earth 8/2 Cotton, 8/4 Cotton, Monte Cristo Boucle, Caterpillar Cotton, Cotton Tail 8/4, and Bamboo Pop and makes four oversize napkins. There are three color options to choose from! Choose from Calico Cat (neutrals), A Dream Come Blue (blues) or Olive You (greens). It's a great way to experience lots of colors and textures!
- Join our Cotton Clouds Rigid Heddle Weaving Group on Facebook so that you can download the PDF pattern and join the fun! We encourage you to share your questions, pictures and accomplishments.
- Let's Weave together! I'm here for you every step of the way!

Fiber Fiesta Napkins ~ A Dream Come Blue
"Fiber Fiesta Napkins Pattern"
The various yarns used in the warp will add interest and texture. This pattern is a warp inspired design which allows you to mix different colors and textures in the warp. We will be weaving with just one weft yarn, so these napkins will be fast and easy!
Weave Structure: plain weave
Equipment needed: Rigid Heddle Loom (2-shaft); 18.6" weaving width; 10 dent reed; 1 shuttle. This project can be woven on any size loom by adding more or less repeats to the warp order.
Yarns: Aurora Earth 8/2 Cotton, 8/4 Cotton, Monte Cristo Boucle, Caterpillar Cotton, Cotton Tail 8/4, and Bamboo Pop. Download the pdf pattern for yardage amounts needed.
Total warp ends: 180
Setts: 10 epi; 15 ppi (this is a recommended sett but will vary depending on the yarns used.
Warp Length: 3 ½ yds or 126”. (allows 34" for take-up and loom waste)
Other supplies: matching sewing thread for hemming
Finished Dimensions: four oversized napkins approximately 14½” x 19” hemmed.
Available as a kit from Cotton Clouds, Inc.
________________________________________________________________
Start by making a chart listing all the yarns you will be using. Label each yarn A, B, C, D, E, F, G, H. We will be using seven warp yarns and one weft yarn in this "Fiber Fiesta Napkins" kit.
Step 1: Warping the Loom
Set up your loom to direct warp a length of 3 ½ yds (126”). You can randomly warp your yarns across the reed or follow a repeating sequence. Warp your thicker textured yarns single (2 threads per slot) and the thinner 8/2 cottons doubled (4 threads per slot). It's easiest to only warp in the slots on this step.

I like to carry my yarns across as I warp as shown in this photo. Simply set aside the non-working warp yarn and continue with the next yarn. This technique is popular for those of us that prefer direct warping. Some like to cut and tie off as you change your yarns. Either method can be used with this project.
An example of a warp sequence may be A, B, C, D, A, E, F, G, A. Repeat this for 18.6" or the desired width of your reed.
Download the PDF "Fiber Fiesta Napkin Pattern" that includes a yarn sample chart and warp order chart. Just click on Files at the top of the Cotton Clouds Rigid Heddle Weaving Facebook group page and you will be able to retrieve your PDF pattern to print.
Step 2: Sleying the ReedOnce you have finished warping your preferred weaving width, wind the yarns onto the back beam. Transfer one thread of the thicker yarns from each slot into the holes and two threads of the thinner yarns into the holes.
Tie the yarns evenly onto the front apron rod and tighten your warp.
Step 3: Preparing the Shuttles
Wind a shuttle with single strand 8/2 Cotton. I prefer using a stick shuttle but a boat shuttle is also an option.
Step 4: Weaving
Weave with scrap yarn to spread the warp evenly.
Weave 23” in plain weave for each napkin. This allows for the length of your napkin plus hem allowance on each end.
Weave a few rows of a contrasting yarn between each napkin and continue weaving the remaining napkins. When you have finished weaving all four napkins, weave a few rows scrap yarn before cutting yarns from the loom.

Step 5: Finishing and Hemming
Remove the napkins from the loom and sew a straight stitch across each end with sewing thread before cutting apart. Using a hot iron, fold each hem over twice to get a nice flat edge. Sew a straight stitch across securing each hem. Machine wash in cool water and dry on normal in machine dryer. Press with a warm iron if needed. Napkins will relax with more washes.
Enjoy or Gift Your Fiber Fiesta Napkins!
I hope you enjoy weaving this month's weaving challenge project! I encourage you to weave some in your favorite yarns. There are endless color and texture possibilities to explore!
Happy Weaving!
